· Pavel
How to Add Custom Product Badges in Shopify (Step-by-Step Guide)
A Shopify badge is one of the most effective ways to draw attention to specific items in your store. A well-placed "Sale," "New Arrival," or "Best Seller" Shopify badge on a product image can meaningfully increase click-through rates and conversions — without any changes to your pricing or copy.
This guide covers three ways to add a custom Shopify badge to your products: using a dedicated app (the fastest and most flexible approach), using Shopify's built-in badge blocks in modern themes, and adding them manually with custom code. Depending on your technical comfort level and how much control you need, one of these will be the right fit.
Why a Shopify Badge Works
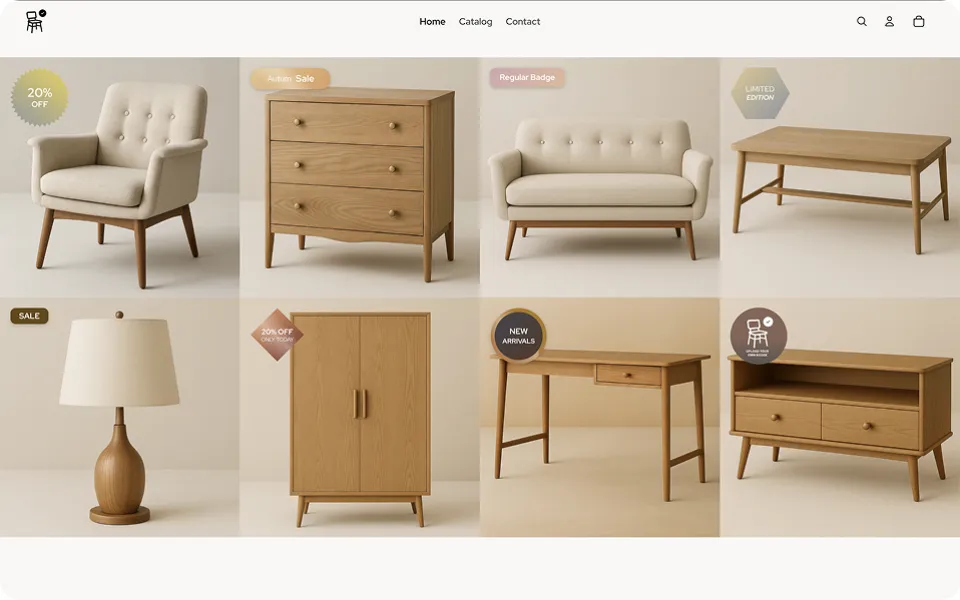
Shoppers scan product grids quickly. A Shopify badge acts as a visual interrupt — it breaks the pattern and signals that something about a product deserves attention. Badges work particularly well for:
- Urgency and scarcity— "Only 3 Left," "Ends Tonight"
- Social proof— "Best Seller," "Staff Pick"
- Promotions— "20% Off," "Flash Deal"
- Discovery— "New Arrival," "Just Restocked"
The key is placing the badge directly on the product image or card, so it's visible before the shopper clicks through. A badge buried on the product page itself is too late in the journey to make much difference.
Method 1: Using a Badge App (Recommended)
For most store owners, an app is the most practical choice. You get full design control, no code editing, and badges that automatically apply to collections or tag-based product groups. This is also the only approach that lets non-developers manage badges independently of their theme.
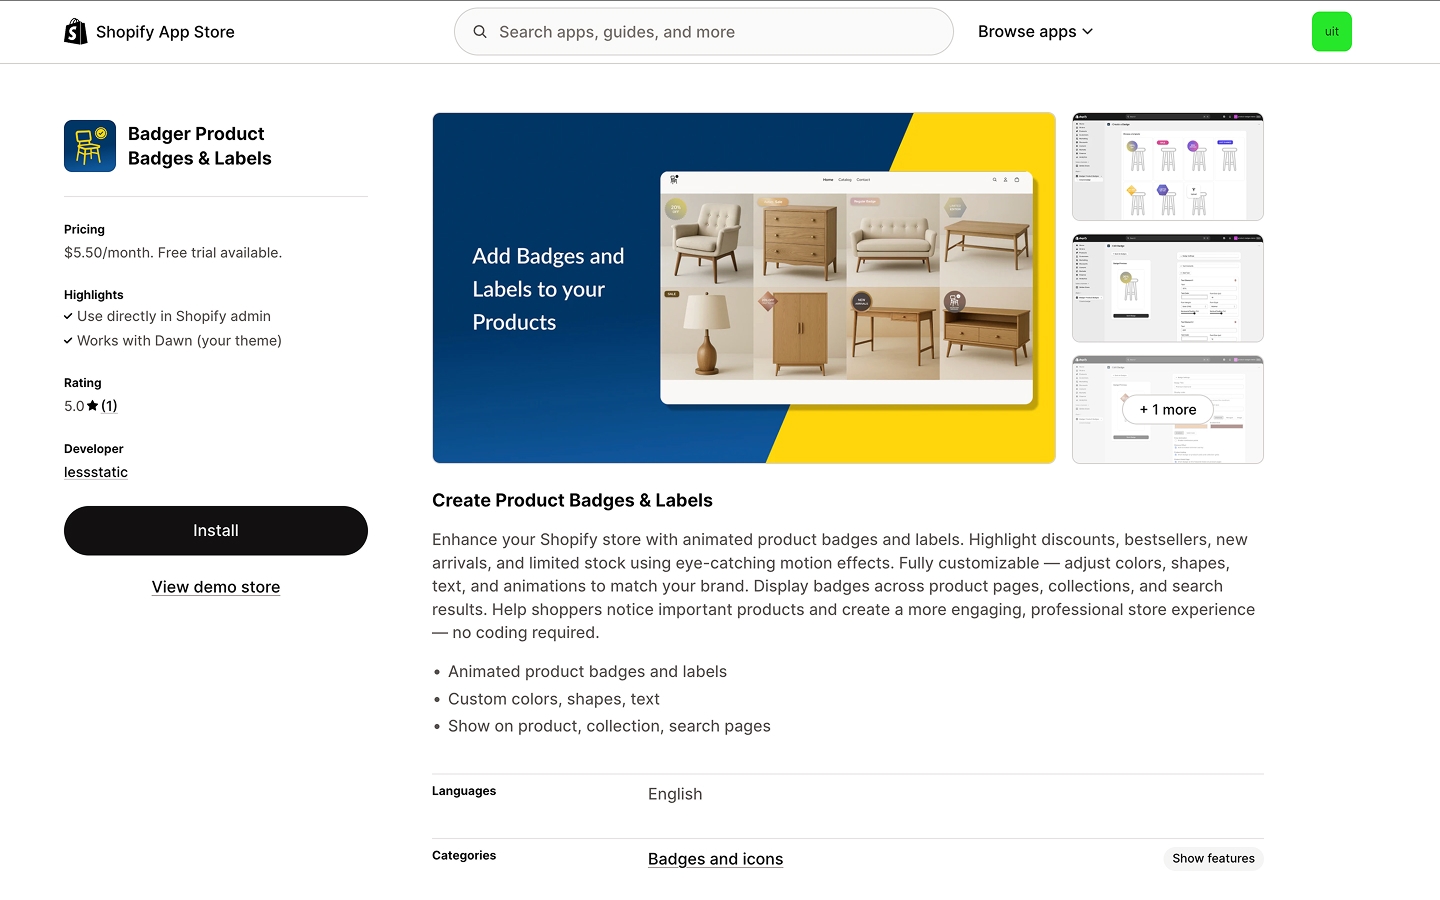
Step-by-Step Guide: How to Use Badger Product Badges
Follow this simple tutorial to get your first badge live on your store today.
1. Install the App
Head over to the Shopify App Store and search for "Badger product badges". Click install to add it to your store. The app is designed to be user-friendly, so you won't need to hire a developer.
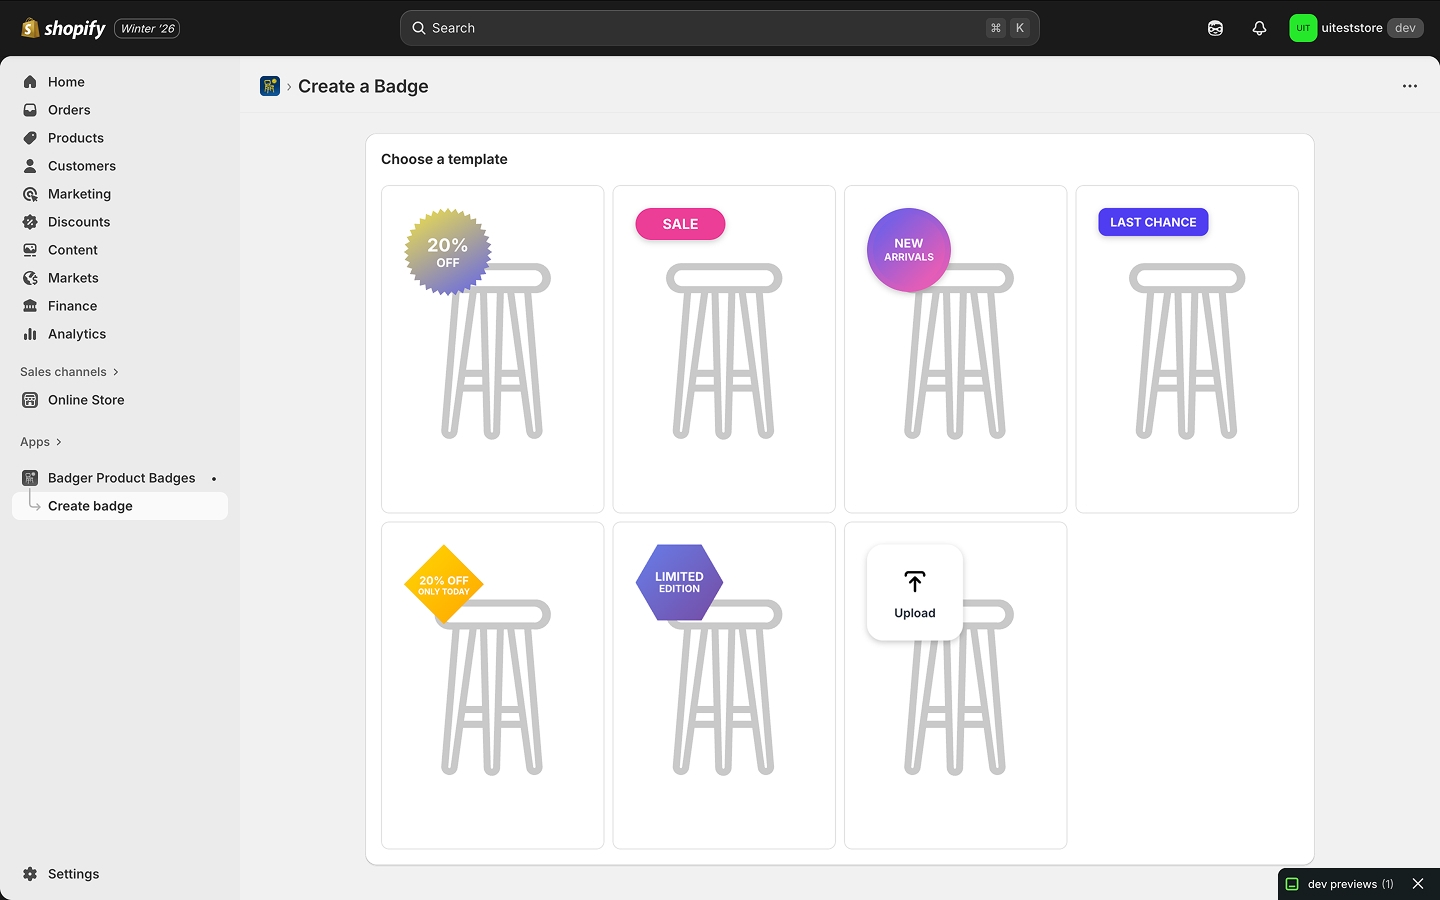
2. Choose Your Template
After the installation, click the create badge button to make your first badge. You will be greeted with a gallery of pre-made templates. Choose a badge template from the gallery that fits your brand.
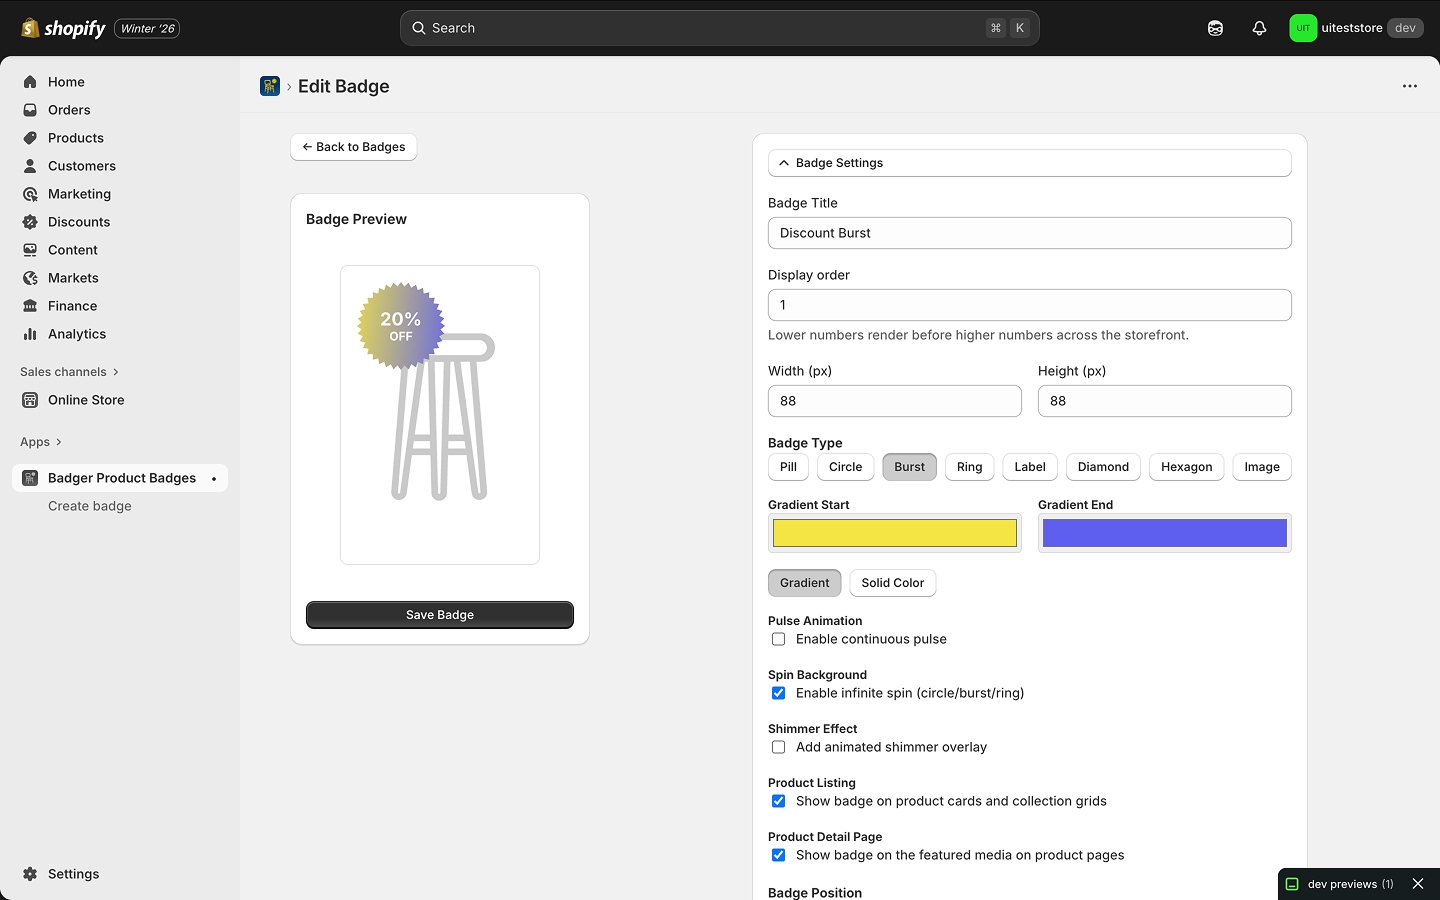
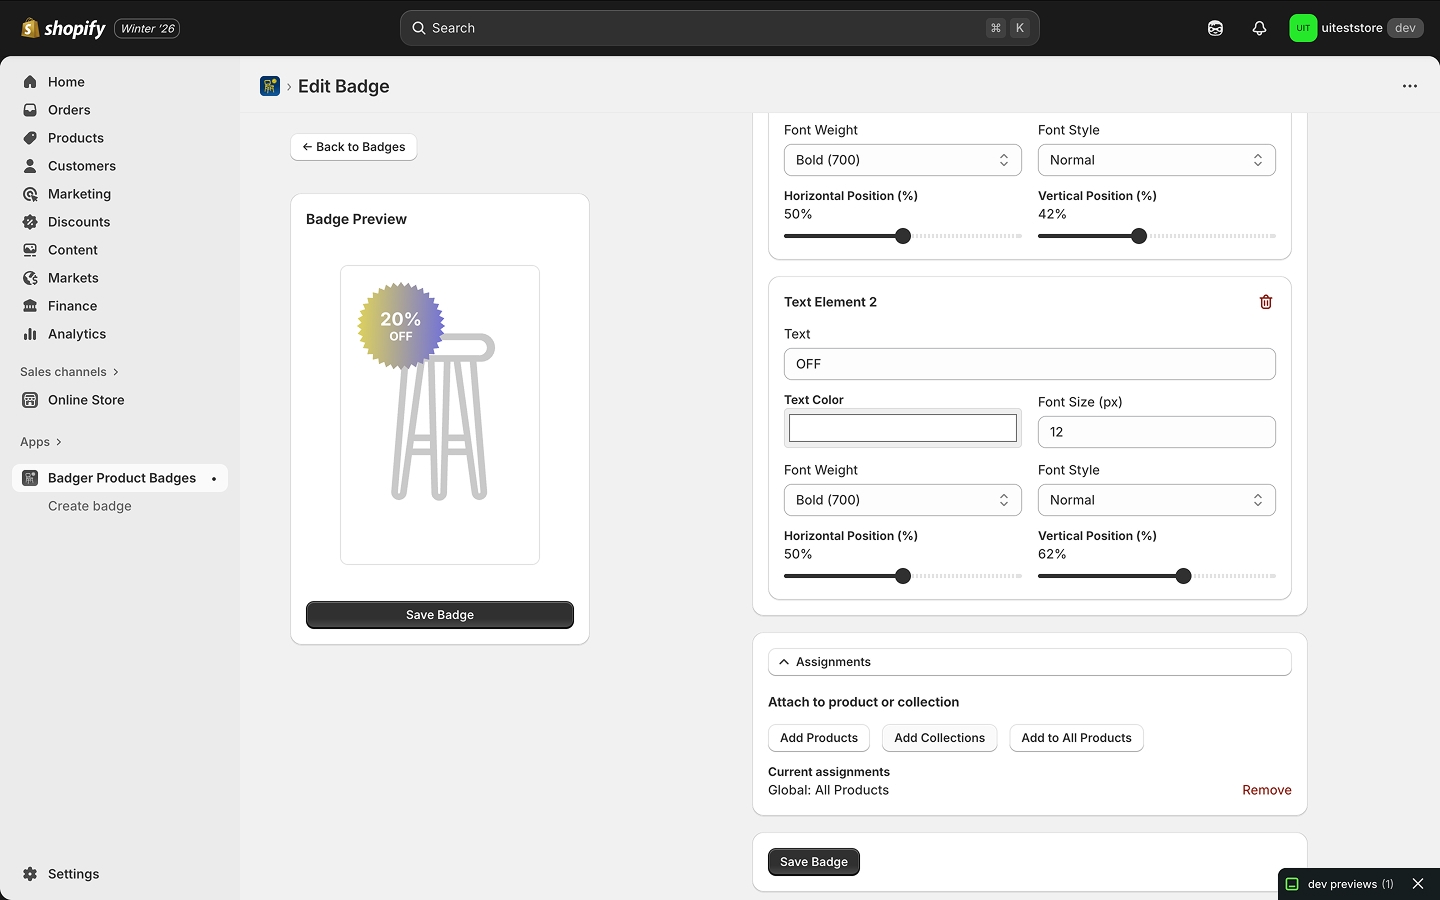
3. Customize Your Design
Once you select a template, you can adjust its settings. Badger offers extensive customization options including:
- Position, Colors, and Size:Customize the badge's visual appearance to match your store.
- Content:You can also change the text or content to fit your needs (e.g., change "Sale" to "Flash Deal").
A few things worth keeping in mind during customization: badges that are too small become illegible on mobile, and very large badges can obscure the product image itself. Aim for a size that's noticeable without dominating the image.
4. Select Your Target
Decide exactly which items should display your new badge. You have three flexible options:
- Single Product: Highlight a specific best-seller or new arrival.
- Specific Collection: Apply badges to entire categories (perfect for seasonal sales).
- Every Product: You can also choose to add the badge to every product in your store for sitewide promotions or store-wide branding.
If your store uses product tags, you can also use tags to control which items display a badge — making it easy to manage large inventories without touching individual product records.
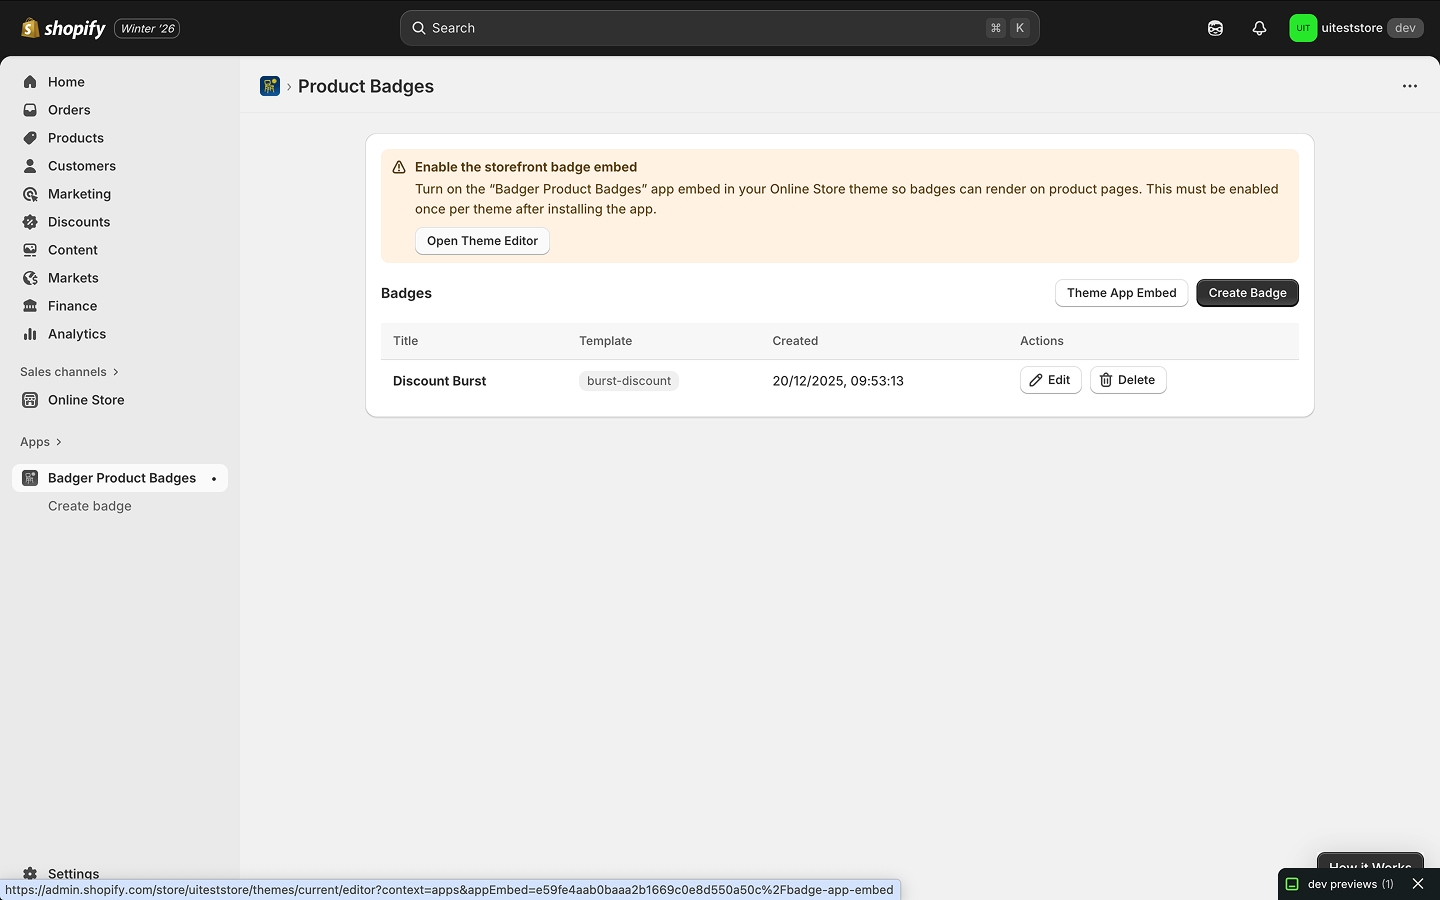
5. Enable the App Embed (Crucial Step!)
Next, we need to enable the storefront badge embed so the badges actually appear on your store.
- Click the open theme editor button inside the app.
- Look for the App Embeds section in the sidebar.
- Toggle the Badger embed to On and save the theme.
Once enabled, your badges will appear on the products you assigned them to across both collection pages and product pages. You can repeat this process to create multiple badges — a "Sale" badge for discounted items, a "New" badge for recent additions, and a "Best Seller" badge for your top performers.
Method 2: Built-in Badge Blocks in Modern Shopify Themes
If you're using a recent Shopify theme — Dawn, Refresh, Craft, Sense, and others released from 2022 onward — you may already have some badge functionality built in, with no app needed.
Shopify's native badge system works through product metafields. Here's how to set it up:
Step 1: Create a Metafield Definition
- In your Shopify admin, go to Settings → Custom Data → Products
- Click Add Definition
- Name it something like "Custom Badge" and set the type to Single line text
- Save the definition
Step 2: Add Badge Values to Your Products
- Navigate to Products and open any product you want to badge
- Scroll down to the Metafields section at the bottom
- Enter your badge text (e.g., "New Arrival") in the custom badge field
- Save the product
Step 3: Add the Badge Block in the Theme Editor
- Go to Online Store → Themes → Customize
- Navigate to a product or collection page template
- In the product section, click Add Block and look for a Badge or Labels block
- Map the block to your custom metafield and save
This approach is lightweight with no performance overhead from a third-party script. The main limitation is scale: applying badges to hundreds of products requires editing each product record individually unless you use Shopify's bulk editor or a CSV import.
Method 3: Custom Code with Liquid and Metafields
For developers or store owners comfortable editing theme files, you can implement product badges entirely through Shopify's Liquid templating language. This gives you complete design control with no app dependency.
Step 1: Create a Product Tag Convention
Decide on a tagging system and apply tags to products via the product editor or in bulk via CSV. For example:
badge-sale→ displays a "Sale" badgebadge-new→ displays a "New" badgebadge-bestseller→ displays a "Best Seller" badge
Step 2: Edit Your Product Card Template
In your theme code, find the file responsible for rendering product cards — usually snippets/product-card.liquid or sections/main-collection-product-grid.liquid. Add the following logic just above the product image:
{% if product.tags contains 'badge-sale' %}
  <span class="product-badge badge-sale">Sale</span>
{% elsif product.tags contains 'badge-new' %}
  <span class="product-badge badge-new">New</span>
{% elsif product.tags contains 'badge-bestseller' %}
  <span class="product-badge badge-bestseller">Best Seller</span>
{% endif %}
Step 3: Add CSS
In your theme's stylesheet, add positioning and styling for the badge. Make sure the product image container has position: relativeset, otherwise the absolute positioning won't work.
.product-badge {
  position: absolute;
  top: 10px;
  left: 10px;
  padding: 4px 10px;
  font-size: 11px;
  font-weight: 700;
  text-transform: uppercase;
  letter-spacing: 0.04em;
  color: #fff;
  border-radius: 3px;
  z-index: 2;
}
.badge-sale       { background-color: #e53e3e; }
.badge-new        { background-color: #2563eb; }
.badge-bestseller { background-color: #d97706; }
Note that theme updates can overwrite Liquid file changes. To protect your work, move the badge logic into a dedicated snippet file and use {% render %} to include it — this makes it much easier to reapply after a theme update.
Which Method Is Right for You?
- App (Badger): Best for most stores. No technical skill needed, high design flexibility, supports bulk assignment by collection or tag.
- Theme built-in blocks: Good for simple use cases on modern themes. Zero performance impact, but limited design control and no bulk assignment.
- Custom Liquid code: Best when you need full control and have developer access. No dependencies, but requires manual tag management and theme maintenance.
Common Issues and How to Fix Them
Badges aren't showing up after enabling the app embed.Double-check that you saved the theme after toggling the embed on. Also verify that the badge has been assigned to at least one product or collection — an unassigned badge won't render anywhere.
Badges appear on the product page but not on collection pages.This usually means the badge target was set to "single product" rather than a collection. Update the target setting inside the app.
The badge is being cut off by the product image container. The image container likely has overflow: hiddenset in your theme's CSS. Either remove that property or reposition the badge to sit outside the image rather than overlapping it.
Badges look fine on desktop but are too small on mobile. Increase the font size and padding for smaller screens using a media query, or increase the overall badge size in the app settings. Aim for a minimum badge height of around 22px on mobile.
A theme update removed my custom code badges. Move your badge logic into a dedicated snippet file that you {% render %} from the product card template. This isolates your customization from theme update overwrites.
Key Features of Badger
- Mobile Responsive: Badges look great on desktops, tablets, and phones.
- Highly Compatible: Works seamlessly with most Shopify themes.
- Fast Loading: Designed not to slow down your site speed.
Ready to Highlight Your Products?
Don't let your best products blend into the background. Whether you use an app, your theme's native blocks, or custom code, adding product badges is one of the quickest wins available for your store's design and conversion rate.
Want to learn more about Badger before installing? Check out the full feature overview and pricing.